Transforming Memories: My Journey to Converting Negatives into Stunning Digital Photos
As a photography enthusiast, I’ve often found myself sifting through old boxes, unearthing forgotten treasures—negatives that tell stories of moments frozen in time. Each strip is a portal to the past, a glimpse into lives once lived and memories cherished. But as technology advances, the challenge becomes clear: how do I convert these fragile negatives into vibrant digital photos that I can share and preserve for future generations? In this journey of transformation, I’ve discovered not just the technical process of conversion, but also the emotional resonance that comes with breathing new life into images that have long been hidden away. Join me as I explore the fascinating world of converting negatives to digital photos, a process that bridges the gap between nostalgia and modernity, allowing us to relive our cherished memories in a whole new light.
I Tried Converting Negatives to Digital Photos and Here Are My Honest Recommendations

KODAK Slide N SCAN Film and Slide Scanner with Large 5” LCD Screen, Convert Color & B&W Negatives & Slides 35mm, 126, 110 Film Negatives & Slides to High Resolution 22MP JPEG Digital Photos
Magnasonic All-in-One 24MP Film Scanner with Large 5″ Display & HDMI, Converts 35mm/126/110/Super 8 Film & 135/126/110 Slides into Digital Photos, Built-in Memory (FS71)

DigitConvert Mobile Film Scanner 35mm, Positive Slide & Negative Scanner Photo Scanner Converts 35mm Slides & Negatives to Digital Photos (2AA Batteries Included)
1. KODAK Slide N SCAN Film and Slide Scanner with Large 5” LCD Screen, Convert Color & B&W Negatives & Slides 35mm, 126, 110 Film Negatives & Slides to High Resolution 22MP JPEG Digital Photos
I recently came across the KODAK Slide N SCAN Film and Slide Scanner, and I must say, it has truly captivated my attention. This product is an absolute gem for anyone looking to preserve their cherished memories captured on film. With its capability to convert both color and black-and-white negatives and slides, this scanner opens a window to relive the past and share those moments with loved ones. Imagine transforming your old 35mm, 126, and 110 film negatives into high-resolution 22MP JPEG digital photos. It’s like bringing your memories back to life in vibrant detail!
One of the standout features of this scanner is its large 5” LCD display. The screen is crystal clear and offers a wide viewing angle, making it incredibly easy to preview and edit photos right on the device. I can’t emphasize enough how convenient this is for sharing images with friends and family, or even using it as a digital picture frame in my home or office. It’s not just a scanner; it’s a multifunctional device that enhances the way I interact with my visual memories.
The convenience of the easy-load film inserts is another aspect that I appreciate. The quick-feeding tray technology allows for continuous loading action, making the scanning process fast and simple. This means I can spend less time fumbling with equipment and more time enjoying the nostalgic journey through my old slides and negatives. The inclusion of various adapters for different film types, along with a cleaning brush, USB, and HDMI cables, shows that KODAK has considered every detail to make this scanner user-friendly.
What I find particularly impressive is the editing capabilities this scanner offers. With just a single touch, I can enhance, resize, and convert my photos using the advanced capture software. The ‘Scan’ button simplifies the process, eliminating complex screens or settings. Plus, the options to choose the film type and adjust color and brightness mean I have the creative freedom to make my photos look just the way I want them. It’s like having a mini photo studio at my fingertips!
Lastly, the KODAK Slide N SCAN is not only super chic but also highly compatible with various devices. It supports SD or SDHC cards up to 32GB, allowing for ample storage of my newly digitized memories. Plus, its ability to connect to any Type-C USB-enabled computer makes it easy for me to transfer my photos and share them online or with family. The sleek design of the scanner also means it blends seamlessly with my home décor—functionality meets style!
In summary, the KODAK Slide N SCAN Film and Slide Scanner is an incredible investment for anyone wanting to preserve and cherish their old memories. With its high-resolution scanning, user-friendly features, and stylish design, it’s hard not to feel a sense of excitement at the prospect of transforming my old film into digital treasures. If you’re looking to relive your cherished moments and share them with loved ones, I strongly encourage you to consider this scanner. Trust me; you won’t regret it!
Feature Description Resolution 22MP JPEG Digital Photos Display 5” LCD Screen with Gallery Mode Film Compatibility 135, 110, 126mm Slides and Negatives Editing Features One-Touch Enhancement, Resizing, and Conversion Storage Supports SD/SDHC Cards up to 32GB Included Accessories Adapters, Cleaning Brush, USB and HDMI Cables
Get It From Amazon Now: Check Price on Amazon & FREE Returns
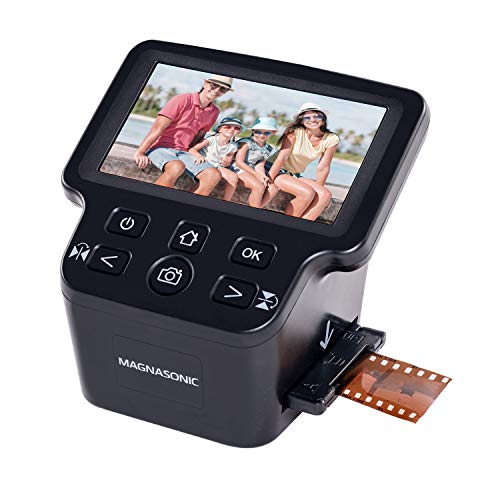
2. Magnasonic All-in-One 24MP Film Scanner with Large 5″ Display & HDMI, Converts 35mm/126/110/Super 8 Film & 135/126/110 Slides into Digital Photos, Built-in Memory (FS71)
I recently came across the Magnasonic All-in-One 24MP Film Scanner, and I must say, it has completely transformed the way I preserve my cherished memories. This device is a game-changer for anyone who has boxes of old film negatives and slides gathering dust. With its ability to convert 35mm, 126, 110, and Super 8 films into high-resolution 24MP digital JPEG files, I can now relive those moments with stunning clarity. The idea of preserving old memories in such a straightforward manner is not only appealing but also essential for anyone looking to keep their family history alive.
One of the standout features of this scanner is its large 5-inch LCD display. It allows me to view my film, slides, and scanned images directly on the device, which is incredibly convenient. The option to connect via HDMI to my TV or monitor (though the cable isn’t included) makes it even better, as I can share these memories with family and friends in a larger format. This feature is particularly useful for family gatherings, where everyone can enjoy a trip down memory lane together.
The built-in memory of 128MB is a nice touch, but what really excites me is the expandable memory capability. The SD card slot can accommodate up to 128GB, meaning I can scan and save a lifetime of photos without worrying about running out of space. This flexibility is fantastic for someone like me who has a considerable collection of slides and negatives. I no longer need to stress about how I’m going to store all these precious images once they’re digitized.
What I appreciate the most about the Magnasonic scanner is that it requires no computer. For individuals who may not be tech-savvy or do not want the hassle of complicated software installations, this is a breath of fresh air. The straightforward operation allows me to adjust brightness, RGB color correction, flip, and mirror images directly on the scanner. This means I can get my photos exactly how I want them without needing to go through multiple editing programs. The fast-loading film trays and the ability to scan photos in less than five seconds each make the whole process efficient and enjoyable.
the Magnasonic All-in-One 24MP Film Scanner is an excellent investment for anyone looking to digitize their old film and slides. It combines ease of use, high-resolution output, and versatile viewing options, making it suitable for both tech enthusiasts and casual users. If you’ve been holding onto those old memories, now is the perfect time to take action. You can easily preserve your family history and share it with future generations. Trust me, you won’t regret making this purchase.
Feature Description High Resolution Converts film into 24MP digital JPEG files. Viewing Options 5” LCD screen or HDMI connection to TV/monitor. Memory Options 128MB built-in memory + SD card slot (up to 128GB). Ease of Use No computer needed; direct adjustments on the scanner. Scanning Speed Scans photos in less than 5 seconds each.
Get It From Amazon Now: Check Price on Amazon & FREE Returns
3. Kodak Slide N Scan Max Digital Film Slide Scanner, Black/Yellow (RODFS70)

As someone who treasures the nostalgia of old photographs, I was thrilled to come across the Kodak Slide N Scan Max Digital Film Slide Scanner (RODFS70). This device is not just a scanner; it’s a time machine that allows me to preserve and relive the precious memories captured in my family’s old slides and negatives. The ability to convert my faded color and black-and-white images into high-quality digital files is a game-changer. With options for both 13 and 22MP resolutions, I can ensure that every detail is preserved, making it a fantastic investment for anyone looking to safeguard their photographic history.
The first feature that caught my attention is the 7” LCD display. This screen is not only large but also crystal-clear, providing a wide viewing angle that makes it easy to preview and edit photos. I find that this functionality is excellent for sharing with friends and family. Imagine gathering around the living room, reliving the memories captured in those slides, all displayed beautifully on this chic screen. Plus, it doubles as an elegant digital picture frame, enhancing my home or office décor. It’s like having a mini gallery right in my space!
What I appreciate most is the convenience of the easy-load film inserts. The quick-feeding tray technology allows for continuous loading, which makes the scanning process fast and straightforward. This is particularly beneficial for someone like me who may have a stack of slides to digitize. The inclusion of various adapters for 135, 110, and 126 films, along with a cleaning brush and USB cables, means I’m well-equipped to tackle any project that comes my way. However, it’s worth noting that an HDMI cable is not included, but I find that minor inconvenience easy to overlook given the overall value.
Moreover, the editing capabilities are superb. The advanced capture software enables me to enhance, resize, and convert photos with just a single touch. The process is so intuitive that I can easily choose the film type, adjust color and brightness, and even assign date and time to each image. This simplicity is a relief, as I often get overwhelmed by complex software. Here, I can focus on what truly matters the memories.
Lastly, the design of the Kodak Slide N Scan Max is super chic and blends seamlessly with my home décor. It supports SD or SDHC cards (up to 32GB) for storage, which is a nice touch, given how many memories I want to digitize. Additionally, it connects effortlessly to any Type-C USB-enabled computer, making it incredibly versatile. For someone who values aesthetics as much as functionality, this scanner is a winner.
Feature Description Resolution 13/22MP for high-quality scans of slides and negatives Display 7” LCD with a wide viewing angle for easy previewing and editing Film Compatibility Supports 135, 110, 126mm negatives and 50mm slides Ease of Use Quick-feeding tray technology for fast scanning Editing Features Single-touch editing with options for color/brightness adjustment Storage Supports SD/SDHC cards (up to 32GB) Design Chic design that complements home or office décor
the Kodak Slide N Scan Max Digital Film Slide Scanner offers an incredible blend of functionality, design, and ease of use that is hard to beat. Whether you’re looking to preserve family memories or create digital archives of old photographs, this device is a worthy investment. I genuinely believe that it will not only meet your needs but exceed your expectations. If you’re on the fence about digitizing your old slides and negatives, I highly encourage you to take the plunge—it’s an experience that you won’t regret!
Get It From Amazon Now: Check Price on Amazon & FREE Returns
4. DigitConvert Mobile Film Scanner 35mm, Positive Slide & Negative Scanner Photo Scanner Converts 35mm Slides & Negatives to Digital Photos (2AA Batteries Included)
As someone who has always appreciated the nostalgia of old photographs, I am genuinely excited to share my thoughts on the DigitConvert Mobile Film Scanner. This innovative product offers a fantastic solution for anyone looking to preserve their cherished memories captured in 35mm slides and negatives. With its combination of functionality and ease of use, I believe this scanner could significantly benefit anyone eager to digitize their old film collections.
One of the standout features of the DigitConvert scanner is its ability to convert 35mm slides and negatives into digital JPEG photos effortlessly. This means I can finally bring those dusty boxes of film out of storage and easily create digital copies that can be shared with family and friends. The simple operation of this scanner ensures that I don’t have to deal with complicated processes or expensive services, which makes it perfect for someone like me who values efficiency and cost-effectiveness.
The foldable design of the scanner is another aspect that I find incredibly appealing. It can easily be collapsed into a compact size, making it a perfect travel companion. Whether I’m off on a family vacation or a weekend getaway, I can just toss it into my backpack without worrying about it taking up too much space. This portability is crucial for someone who enjoys documenting their travels and wants to keep their memories alive, even on the go.
Moreover, the free app that comes with the DigitConvert scanner enhances the overall experience. Not only does it allow me to digitize my films and slides seamlessly, but it also comes with detailed instructions that make setup a breeze. I appreciate the flexibility offered by the option to use other apps like SlideScan and FilmBox, which cater to specific scanning needs. This versatility means I can choose the best app for my project, ensuring I get the results I want.
Using the scanner is incredibly straightforward, which is a major plus for someone who isn’t particularly tech-savvy. All I need to do is insert the included AA batteries, place the slide or negative in the tray, and align my smartphone camera with the light panel. The LED backlight provides excellent illumination, and the autofocus feature ensures that I get the clearest images possible. It’s a user-friendly design that has truly taken the hassle out of digitizing photos.
Lastly, the retractable phone clamp adds an extra layer of stability, which I find essential for achieving high-quality scans. Knowing that my phone is securely held in place as I capture images gives me peace of mind, especially when working with delicate slides and negatives. This thoughtful design consideration shows that the creators of the DigitConvert scanner understand the needs of their users and have developed a product that addresses them effectively.
To summarize my thoughts on the DigitConvert Mobile Film Scanner, it truly stands out in the market for anyone looking to digitize their cherished memories. Its ease of use, portability, and versatility make it an excellent choice for both casual users and photography enthusiasts. If you’re like me and want to preserve your memories for future generations or simply enjoy the process of digitization, I highly recommend considering this product. With the DigitConvert scanner in hand, you’ll be well on your way to bringing your old photos into the digital age.
Feature Description Conversion Capability Converts 35mm slides and negatives to digital JPEG photos Design Foldable design for easy travel and storage Free App Includes a free app for digitization, with additional app options available Ease of Use Simple operation with clear instructions Stability Retractable phone clamp for added stability during scanning
Get It From Amazon Now: Check Price on Amazon & FREE Returns
Why Converting Negatives to Digital Photos Helped Me
When I first decided to convert my old film negatives to digital photos, I didn’t realize the profound impact it would have on my life. The process opened up a treasure trove of memories that I had almost forgotten. Each negative held a story, a moment in time that I could revisit, and transforming those into digital files made it easy for me to relive those experiences anytime I wanted.
Additionally, digitizing my negatives allowed me to share my memories with family and friends effortlessly. I could create digital albums, share images on social media, and even print high-quality copies to gift to loved ones. It fostered connection and nostalgia, as I could share moments from my past that others in my life had also experienced. This act of sharing not only strengthened my relationships but also sparked conversations about our shared history.
Moreover, converting my negatives to digital format provided a sense of preservation. I knew that physical negatives could degrade over time, losing their quality and, eventually, the memories they held. By digitizing them, I ensured that these precious moments would be safeguarded against deterioration, making it easier to archive and store them in a way that would last for generations. This process turned my negatives
Buying Guide: Convert Negatives To Digital Photos
Understanding My Needs
When I decided to convert my old film negatives to digital photos, I realized I needed to assess what I wanted from the process. Was I looking for high-quality scans for professional use, or was this more about preserving memories for personal enjoyment? Understanding my needs helped narrow down my options significantly.
Choosing the Right Equipment
I discovered that I had several options for converting my negatives, including dedicated film scanners, flatbed scanners, and even smartphone apps. Each option came with its own set of features and quality levels. I considered how much I was willing to invest, as well as the convenience of each method.
Scanning Resolution and Quality
One thing I learned was the importance of scanning resolution. Higher DPI (dots per inch) settings generally result in better quality images. I found that for archiving purposes, scanning at least 2400 DPI was ideal. This way, I could enlarge photos without losing detail.
Software Compatibility
As I explored my options, I realized that the software that comes with the scanner or app plays a crucial role. I needed something user-friendly that would allow me to edit and enhance my images easily. It was helpful to check if the software was compatible with my operating system and if it supported batch processing.
Ease of Use
Ease of use was a significant factor for me. I wanted a device or app that wouldn’t require extensive technical knowledge. I appreciated features like automatic dust and scratch removal, which saved me time in post-processing.
Portability and Storage
I also considered how portable the equipment was. If I wanted to take it to a friend’s house or use it on the go, I needed something lightweight and compact. Additionally, I made sure to think about storage options for my digital files. I wanted a reliable way to back up my scans, whether on an external hard drive or cloud storage.
Budget Considerations
Budget was a significant factor for me. I had to decide how much I was willing to spend on this project. I found that there are decent options at various price points, from affordable DIY methods to more expensive professional services. Setting a budget helped me focus on what was realistic for my needs.
Researching Reviews and Recommendations
Before making my final decision, I took the time to read reviews and seek recommendations from others who had gone through the process. I found forums and articles that provided valuable insights into what worked and what didn’t, which helped me avoid common pitfalls.
Final Thoughts
Ultimately, converting negatives to digital photos was a rewarding process for me. I now have a treasure trove of memories preserved in a format that I can easily share and enjoy. By carefully considering my needs and conducting thorough research, I made a choice that best suited my situation. I hope my journey can help guide you on your own path to digitizing those precious memories!
Author Profile
-
Hi, I’m María Hirsch. I’m a proud daughter of Mexican immigrants, raised with the kind of resilience that only comes from living both sides of a border and dreaming past it. I spent my early childhood in Los Angeles before my family moved to Tecate, Mexico, after my father a hardworking gardener suffered an injury that made staying in L.A. impossible. Like many families before us, we found a way. My siblings and I commuted across the border daily to attend school in East San Diego County, driven by my parents’ one wish: that we go to college.
In 2025, I took a new step. Alongside my continued community work, I began writing an informative blog focused on personal product analysis and first-hand usage reviews. After years of helping families navigate systems from school enrollment to public services I realized how often people, especially parents, are left overwhelmed when trying to choose what’s right for their homes, health, and children. I wanted to bridge that gap.
Latest entries
- April 20, 2025Personal RecommendationsWhy I Switched to LED Lights for My Truck Running Boards: A Game-Changer for Safety and Style
- April 20, 2025Personal RecommendationsTransforming My Kitchen: My Expert Experience with a Spice Organizer for Pull-Out Skinny Cabinets
- April 20, 2025Personal RecommendationsWhy I Switched to a Heat Light for My Tortoise: An Expert’s Guide to Optimal Care
- April 20, 2025Personal RecommendationsWhy I Chose a 7-Piece Bedding Set for My King Size Bed: A Game-Changer in Comfort and Style